For many, the hard part of writing a book, eBook, or white paper isn’t the writing; it’s organizing your ideas before you begin to write. Months can go by without significant progress, while the stress keeps increasing.
Yet, once you organize your ideas — deciding which ideas to include, which to leave out, and the proper sequence — writing becomes much more manageable.
This is especially true if you’re creating your book’s table of contents in Mindjet MindManager, which will allow you to visually organize your ideas, schedule your writing sessions, and track your progress.
My Book Planner mind map has helped me and my clients save time planning hundreds of writing projects. It provides a simple, flexible solution that helps you move beyond the organizing stage, so you can begin writing and marketing your project.
Guiding You to the Right Decisions
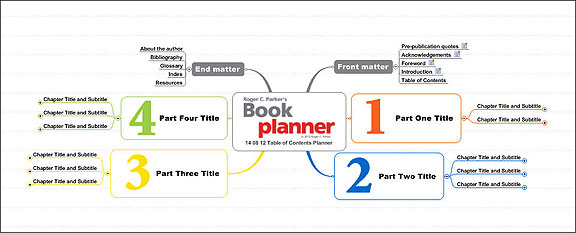
The key to planning and organizing a book as quickly as possible is to view your ideas as building blocks, which need to be grouped together in logical categories. Few nonfiction books consist of just chapters. In most cases, the chapters are organized into parts or sections. In addition, there’s usually content grouped at the beginning and end of the book.
I suggest you start by organizing your book into 3 classic parts — a beginning, middle, and end. As an example:
- Part 1: Set the stage. Describe the problem your intended readers want to solve, or a goal they want to achieve. Discuss the origins of the problem, and why current solutions haven’t worked. Finally, preview the solution you’re suggesting and the benefits it offers.
- Part 2: Provide a roadmap to success. Eachof the chapters in this section focus on a particular aspect of the problem, or a specific set of tasks that readers can take to solve their problem or achieve their goal.
- Part 3: Plant the seeds for constant improvement. The final section can show readers solidify their gains and build on their success, making it a permanent part of their firm’s procedures. Other chapters can suggest ways readers can take their success to a higher level, or you can address special situations or problems that readers might encounter.
Obviously, there’s no one way to write a book. But, hopefully, the above will encourage you to look for ways you can immediately begin to organize your ideas into logical “buckets” or “containers.”
Note: For your convenience, the sample Book Planner Mindjet MindManager map, which you can download here, contains an optional Part 4 graphic, which you can delete or modify as desired.
Questions and Answers Help You Plan Each Chapter
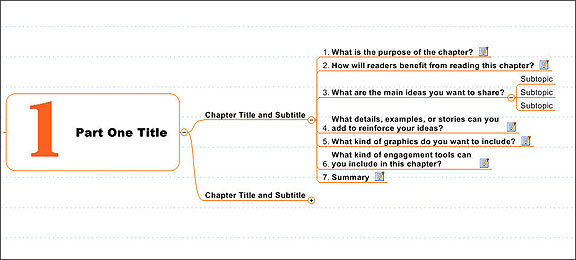
After you’ve planned the overall “big picture” organization of your book, it’s time to plan the contents of the individual chapters.
To help you save time during this essential step, I suggest you use the following 7 questions to guide you through planning each chapter:
- What is the purpose of the chapter? Identifying what you want to accomplish in each chapter will help you decide what ideas and information should appear in the chapter.
- How will readers benefit from reading the chapter? How will the information help advance the reader towards solving their problem or achieving their desired goal?
- What are the main ideas you want to share? Your answers will help determine the top-level subheads, or divisions, of each chapter. I’ve included space for 3 big ideas, but you can add as many as needed. The ideas can be resources, approaches, or specific tasks.
- What details, examples, or stories can you use to reinforce your ideas? This is where you explain the relevance of the main ideas, or prove their value. Examples and case studies can add story-value to your narrative.
- What kind of graphics can you use to add visual interest? Few readers want to spend time with books that resemble “gray walls of words.” As you flesh-out the ideas for each chapter, look for ways you can break up the text with visuals that reinforce your message.
- What kind of engagement tools can you include in this chapter? Your book’s effectiveness will be judged by its ability to inspire your readers to act. Engage them with questions, exercises, and spaces to take notes.
- What’s the best way to end this chapter? Look for ways to help readers recognize the value of the information you’ve provided in the chapter. For example, you might include a list of important ideas introduced in the chapter. In addition, prepare a segue — or introduction — to the next chapter, so readers will look forward to continuing to read your book.
For your convenience, I’ve included a Chapter Title and Subtitle Map Part, so you can add as many chapters as needed.
Tip: Pay as much attention to your chapter titles and subtitles as you do to your book’s title and subtitle. This will pay off in terms of enhanced search engine visibility when your book’s table of contents appears online.
Using Notes and Prompts to Build Out Each Chapter
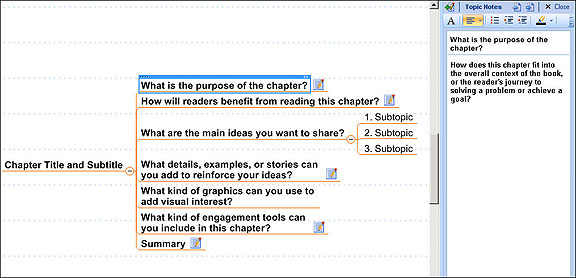
To help you answer the 7 key questions associated with each chapter, I’ve included prompts in the Notes associated with each question. These prompts are the same ones I use when planning my own books or helping clients plan their books, eBooks, and white papers.
The prompts are just suggestions; you can delete the ones that don’t apply to you. You can also delete the prompts after you’ve answered the questions.
Rather than adding subtopics, I encourage you to answer the questions using MindManager’s Notes feature. This makes it easier for you to later export your Book Planner mind map to your word processor for editing and formatting your table of contents for your book proposal.
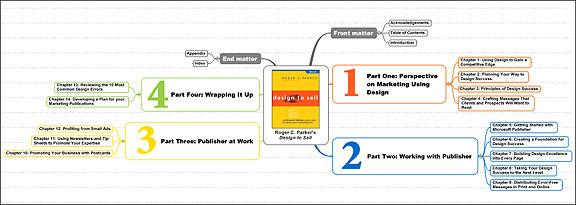
Above is an example of a completed MindManager map, reconstructed from the map I used to prepare the book. (At the time, I wasn’t using the Notes feature as much as I am now. I was simply using the mind map for ideas, not building out each chapter.)
Deadline Management
Once you’ve completed your Book Planner, you can use your Book Planner to add Task Information, like Priorities, Start Dates, Due Dates, and track your progress. This helps authors overcome one of the biggest hurdles they face: distant deadlines based on completing large sections of your book.
When working with trade publishers, the contract typically specifies:
- 1/3 of the manuscript is due in two months
- Another 1/3 is due in four months
- The final 1/3 of the month is due in six months
This is often an invitation to disaster! Human nature being what it is, it’s much easier to put off working when the obligation to meet a deadline is so far away, and includes a vast amount of work. When the deadline is soon and requires less work — just a chapter, or part of a chapter — you’re far less likely to procrastinate.
The problem becomes especially acute towards the end of the project, when you’re not only completing the first draft of the final section, but you’re also addressing editorial queries and proofreading the final drafts of previously-submitted chapters.
The writing process is a lot easier when you schedule your book as a series of short, easily accomplished tasks with tight, frequent deadlines.
Options and Tips
 Here are some additional suggestions:
- Postpone chapters until later. Working with clients, I often find it useful to temporarily delete the Chapter Titles and Subtitles map parts, and focus on the identifying ideas for just the major divisions of the book. While brainstorming, we’ll simply add ideas to the parts corresponding to the beginning, middle, and end of the book. Then, we’ll add the Chapter Title and Subtitle map parts begin to assign the ideas to the appropriate chapters within each section.
- Blogging a book. The Book Planner is great first step towards writing a book as a series of blog posts. After you complete the initial structure of your book, you can subdivide each chapter into individual blog posts, and add them to your Blog Post Planner, adding Start Dates and Due Dates for each post. See How to Organize Your Blog Content with A 3-Step Post Tracker
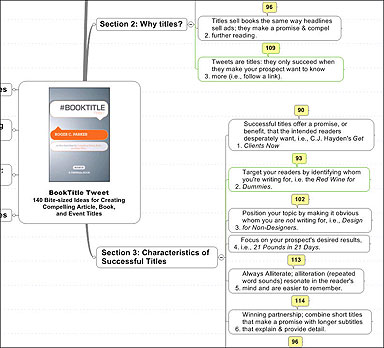
- Writing a book in a mind map. I’ve actually written the first draft of a book in a MindManager map.This is becoming more and more feasible, as shorter “tips books,” or “140-character Twitter books,” grow more popular. These books distill the essence of a topic down to short, actionable tips or examples. Note: the call-outs in the mind map of my #Book Title Tweet: 140 Bite-Sized Ideas for Compelling Article, Book, and Event Titles shown above represents the character counts (including spaces) for each topic. Little needed to be done after the ideas were placed in the proper order.
As always, mind mapping is a personal journey of discovery. As you move forward, you’ll find out what works for you, and — over time — you’ll improve it so it becomes even more efficient. But you have to start somewhere!
Converting Intentions into Action
Year after year, “writing a book” remains one of the most frequently mentioned, high-priority personal goals shared by the majority of Americans. However, even in today’s age of self-publishing and eBooks, only a relatively few books get written and published, compared to the number who want to write a book.
Hopefully, my MindManager Book Planner map will inspire you to take the first steps to turning your ideas into a published book. I invite you to share your experiences and progress using the Book Planner mind map for planning not only for books and eBooks, but also for projects like reports, presentations, and white papers.

