
I’d like to share some of the lessons I’ve learned during the past 6 months, working with my Mindjet Content Dashboard.
As described in the original article, my goal was to gain more control over my time — in particular, to be able to address several of my perennial frustrations and time-wasters involved when tracking resources like experts, #hashtags, marketing projects, and testimonials.
I also wanted to do a better job tracking blog posts — completed, in-process, and ideas for the future — as described in a recent Content Marketing Institute blog post, How to Organize Your Blog Content with a 3-Step Post Tracker. I wanted to be able to see which topics I’d covered, save time accessing the text and graphic files created for each post, and track the overall popularity of different posts.
Content Dashboard Lessons
I’ve made several changes to the Content Dashboard, which is always open whenever I’m working on my computer. As before, my redesigned Content Dashboard takes me to linked mind maps for specific resources and tasks, like marketing guest blogs.
 My biggest improvement was to revise the way I use Links (shortcut CTRL+K) and Notes (CTRL+T) on the Content Dashboard.
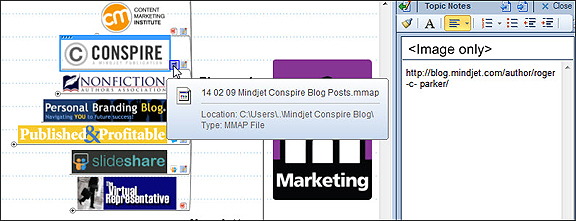
– Links. The primary link associated with each guest blog no longer goes to the blog’s URL. Instead, the link goes to the mind map where I plan and track the articles or topics associated with each post. Each mind map contains the blog’s logo for recognition.
– Notes. In the Notes associated with each blog, however, I include a text link to the URLs of my Portal pages on the various blog posts, which typically contain a bio, as well as descriptions and links to the various posts I’ve contributed (see example). If the blog doesn’t offer a portal page for guest contributors, I link to a Search phrase on each blog based around my name.
The other improvement I’ve made is to include text in the center topic along with my Content Dashboard graphic. I also update the date when I add or edit the Dashboard. This ensures that the map title shows up when I open the map on different devices, like iPads or Android mobile devices. This is true of all my Content Dashboard mind maps.
Expert Tracker Lessons
My original decision to track experts based on their personal names, (last-name, first name), instead of by the title of their blog, book, or website title, has worked as I had hoped. I’m discovering that more and more experts have multiple websites; authors, for example, often have individual websites for each of their books, as well as a general, comprehensive website.
The first major improvement to the Expert Tracker was to add Marker Resources to indicate each expert’s category (or categories). This also allowed me to use MindManager’s Power Filter to display experts by category. The second big improvement was to break-up the original four topics into separate topics for each letter of the alphabet.
Recently, I began using the Notes feature to associate each author with their branded identity, based on their best-known book or their blog or website URL titles. When appropriate, I’ve also been including a thumbnail of their headshot, or their most important book cover. Adding the visuals to the Notes feature helps me instantly relate experts to their brand.
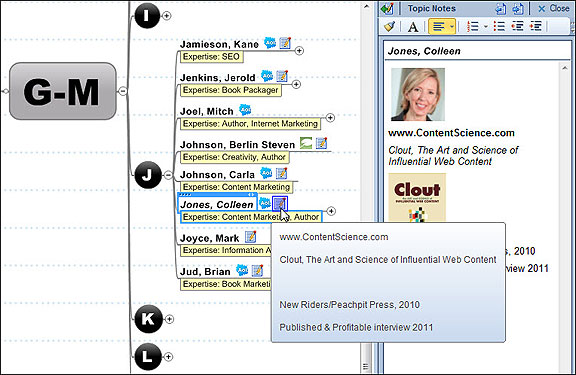 As you can see from the above graphic, MindManager displays the Notes text and graphics whenever the mouse pointer is over the Notes icon. As a result, I can immediately relate experts to their brand without opening the Notes feature. Yet, if I need to, I can add additional URLs or even reminders — like where I meet the expert in person — to their listings.
Discovering More Uses for Find
During the last few months, I’ve also been finding more and more uses for MindManager’s Find (CTRL+F) feature. Often, for example, I remember that a particular expert’s first name was Carol, or their book title contained the words “Field Guide.”
With the Find feature, I can usually go directly to their listing, or locate them using just part of their name, book title, or website name. If the desired expert isn’t the first to show up, I can quickly go on to the next by repeating the CTRL+F keystroke shortcut to find the next occurrence.
#Hashtag Tracker Notes
The main improvement to my #Hashtag Tracker has been to use the Find feature more and more when searching for #Hashtags. This frequently happens when I’m using Twitter to build my network, and I’m looking for #Hashtags to target different categories of readers when curating content from magazines, newspapers, authors, blogs, and videos using online compilation sources like Zite.
The only other #Hastag Tracker improvement is to make greater use of MindManager’s Show Branch Only command, in order to view different categories of #Hashtags at greater magnification.
Testimonial Tracker
The only change to my Testimonial Tracker has been to begin using Marker Resources to organize different categories of testimonials (i.e., attendees, clients, copywriting, event planners, graphic design, mind mapping, readers, etc.). This makes it easier to locate testimonials that are appropriate to the proposals I’m preparing.
What Mind Mapping Has in Common with Writing
The biggest lessons, of course, is that mind mapping has a lot in common with writing. As I constantly remind my book coaching clients, “The first draft doesn’t need to be perfect; it will get better as you work with it!” So, the sooner you get involved with a Content Dashboard, the faster you’ll progress.
The other commonality involves habit: success is the result of consistently doing the right things every day. By spending as little as 15-20 minutes updating my Content Dashboard mind maps, they’re becoming increasingly useful and efficient.
How Will You Save Time with a Content Dashboard?
How much time do you think you’d save with a similar Mindjet Content Dashboard? How do you keep track of ideas, files, and resources? Share your dashboard experiences, shortcuts, and suggestions in the comments section, below.