I recently shared the latest addition to my Mindjet Content Dashboard Series, Adding an Expert Tracker Mind Map.
Now that you’ve had time to work with it, I’d like to share a simple 3-step guide for using tags and filters to save time and get more done. Mindjet for Windows’ tags and filters will make it easy for you to quickly locate experts on the basis of their influence and areas of expertise. You’ll be able to:
– Locate experts by category. Follow conversations in your field, or search for inspiration elsewhere.
– Identify the thought leaders in each category. When your time is limited, you can focus your attention on just those with the most consistently helpful and relevant ideas.
– Track your competition. Follow or join their current conversations and topics.
Best of all — as you can see from the below graphic — tags and filters make your Expert Tracker mind map easy to use, even when you’re tracking hundreds of experts!

Step 1: Group
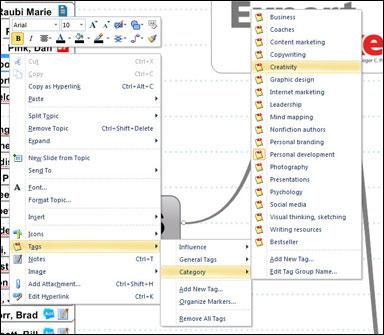
The first step is to create groups of markers, or tags, that you can associate with each expert.
I started by creating an Influence tag group. Since I wanted to keep things as simple as possible, I only created three tags:
– Internet Top 10, for instant access to my favorite thought leaders, the Seth Godins and David Meerman Scotts of the marketing world.
– A-list for those who are the leading voices in their specific fields.
– Competitors who address the same markets as I do.
I found the easiest way to do this was to right-click the topic associated with one of the experts, then select Tags, followed by Add New Tag. When the New Tag dialog box appears, enter a Group name (i.e., Influence) followed by one of the desired tag Names, (i.e., A-List.) Each time you click the Add button, you’ll be prompted to add another name.
Next, I created a Category group, so I could categorize experts by their specialty. There’s nothing “universal” about my categories and names; yours will undoubtedly be different.
After you’re finished creating your own tag groups, use MindManager’s Organize Group feature to display the tags in each category in alphabetical order.
Step 2: Update
The next step is to update your Expert Tracker mind map by applying tags to each topic.
– If you’re working with a previously created Expert Tracker, simply right-click each topic, select Tags, followed by the appropriate tag.
– Note: you can associate experts with more than one category, i.e., Writing resources and Creativity experts, or Graphic designers who also write about Psychology. Use this feature with restraint, though. Simple is always better.
– If you’ve already created a very large Expert Tracker map, don’t feel you have to update every expert in your map in a single working session. It might be easier to add tags over the course of several short working sessions (i.e., 15-minutes, spread out over a couple of days).
As you’re adding new experts, however, you should get in the habit of inserting labels and tags as you work.
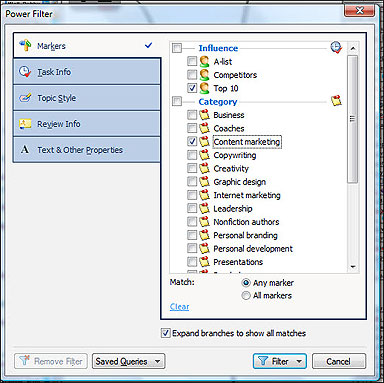
Step 3: Filter
Your Expert Tracker will become far more useful when you use MindManager’s View> Filter feature to selectively display the experts associated with each tag. This will soon become your preferred working view.
MindManager’s Filter is both easy and powerful. It’s easy because you can work visually. It’s powerful because you can Filter on one, or more, tags. You can display just A-List writing resources, competing graphic designers, or bestselling authors of books about visual thinking. You can also save time by saving Queries for later use.
Enhancing Your Expert Tracker Mind Map
Here are some tips for working with your Expert Tracker:
– Frequently edit your tags. The goal of the Expert Tracker is not to endlessly “collect” tags, but to permit easy access to the best experts in various fields. This requires ongoing selectivity.
– Divide and conquer. When categories become uncomfortably large, subdivide them into two or more categories.
– Share your tags. Right-clicking on the name of a tag group allows you to copy and paste tag groups from map to map. You can also incorporate markers into maps that you save as templates, which you can share with coworkers and clients.
– Simplifying your Expert Tracker. Mindjet’s View>Show/Hide command allows you to show or hide the Tags associated with experts (or topics). Even if they are hidden, however, they will remain active when you Filter your map. In addition, you can choose whether or not to display the Tag Group Name associated with each tag.
How do YOU use Mindjet to track experts in your field?
As I discovered while working with my Expert Tracker, mind mapping is an ongoing journey. Luckily, you don’t have to create the “perfect” map on the first try. Mindjet makes it easy to refine your tags as you proceed.
Have questions about using Mindjet to track the experts in your field? Let us know. Or, share your thoughts, examples, experiences, and suggestions in the comments section below.